Have you ever wanted to make a copper ring that looks like a regular ring? When my wedding band didn’t fit so well I wanted something that looked more like a regular ring and not a wire one. The process you’ll use to make this copper ring is really similar to brazing. Also, in addition to the techniques used in the supplemental video, you’ll see a way to seal the copper ring so it won’t turn your finger green.
Supplemental Video
Tools and Materials
- MAP torch (yellow canister)
- Sockets from a Socket Set
- Measuring Device (like calipers or a stick or something)
- Shaping tools like files and sand paper
- Plaster of Paris
- Sand (play sand is fine)
- Disposable cup
- Thin copper wire
- Rustoleum clear engine enamel
Measure Your Finger
Start by measuring the finger you’re making the ring for. Measure the thickest part of your finger. In the video I use some inexpensive digital calipers, but you could easily eyeball it with a tape measure or even a stick for reference.
[fusion_builder_container hundred_percent=”yes” overflow=”visible”][fusion_builder_row][fusion_builder_column type=”1_1″ background_position=”left top” background_color=”” border_size=”” border_color=”” border_style=”solid” spacing=”yes” background_image=”” background_repeat=”no-repeat” padding=”” margin_top=”0px” margin_bottom=”0px” class=”” id=”” animation_type=”” animation_speed=”0.3″ animation_direction=”left” hide_on_mobile=”no” center_content=”no” min_height=”none”]

Measuring Finger Diameter For Copper Ring
Making the Mould
Find yourself a socket where the inside of the socket is just smaller than what you measured for your finger. You want to make sure there’s extra material inside to remove.
[/fusion_builder_column][fusion_builder_column type=”1_1″ background_position=”left top” background_color=”” border_size=”” border_color=”” border_style=”solid” spacing=”yes” background_image=”” background_repeat=”no-repeat” padding=”” margin_top=”0px” margin_bottom=”0px” class=”” id=”” animation_type=”” animation_speed=”0.3″ animation_direction=”left” hide_on_mobile=”no” center_content=”no” min_height=”none”]

Measuring The Socket For The Mould
Make sure to measure the smallest interior diameter of the socket, the flat sides and not the interior corners.
Use the plastic cups and mix
- 1 part plaster of paris
- 1 part sand
- Just enough water till it becomes workable. Start with something like 1/2 part water
[/fusion_builder_column][fusion_builder_column type=”1_1″ background_position=”left top” background_color=”” border_size=”” border_color=”” border_style=”solid” spacing=”yes” background_image=”” background_repeat=”no-repeat” padding=”” margin_top=”0px” margin_bottom=”0px” class=”” id=”” animation_type=”” animation_speed=”0.3″ animation_direction=”left” hide_on_mobile=”no” center_content=”no” min_height=”none”]

Mixing The Casting Material
Once mixed tap the mixture a bit to try and get any air bubbles out.
Let it dry for about 5 minutes. Press the socket about ¼” in the mould and twist it so the interior socket shape makes a circle.
[/fusion_builder_column][fusion_builder_column type=”1_1″ background_position=”left top” background_color=”” border_size=”” border_color=”” border_style=”solid” spacing=”yes” background_image=”” background_repeat=”no-repeat” padding=”” margin_top=”0px” margin_bottom=”0px” class=”” id=”” animation_type=”” animation_speed=”0.3″ animation_direction=”left” hide_on_mobile=”no” center_content=”no” min_height=”none”]

Using A Socket To Make The Ring Impression
It will take about an hour for the mould to dry then you can take / cut out the plaster of paris mould from the plastic cup.
[/fusion_builder_column][fusion_builder_column type=”1_1″ background_position=”left top” background_color=”” border_size=”” border_color=”” border_style=”solid” spacing=”yes” background_image=”” background_repeat=”no-repeat” padding=”” margin_top=”0px” margin_bottom=”0px” class=”” id=”” animation_type=”” animation_speed=”0.3″ animation_direction=”left” hide_on_mobile=”no” center_content=”no” min_height=”none”]

Removing The Ring Mould From The Plastic
Copper Wire Thickness
I’ll start with what didn’t work. Originally I was trying to use some old electrical wire. The wire gauge was too thick and dissipated the heat too fast to get it to melt into the pool of copper. This is why I used a thinner gauge wire from the electronics transformer.
[/fusion_builder_column][fusion_builder_column type=”1_1″ background_position=”left top” background_color=”” border_size=”” border_color=”” border_style=”solid” spacing=”yes” background_image=”” background_repeat=”no-repeat” padding=”” margin_top=”0px” margin_bottom=”0px” class=”” id=”” animation_type=”” animation_speed=”0.3″ animation_direction=”left” hide_on_mobile=”no” center_content=”no” min_height=”none”]

Electronics Transformer
You could probably use any regular electronics wire or twisted copper wire, for the process. Just strip off the insulation if possible.
[/fusion_builder_column][fusion_builder_column type=”1_1″ background_position=”left top” background_color=”” border_size=”” border_color=”” border_style=”solid” spacing=”yes” background_image=”” background_repeat=”no-repeat” padding=”” margin_top=”0px” margin_bottom=”0px” class=”” id=”” animation_type=”” animation_speed=”0.3″ animation_direction=”left” hide_on_mobile=”no” center_content=”no” min_height=”none”]
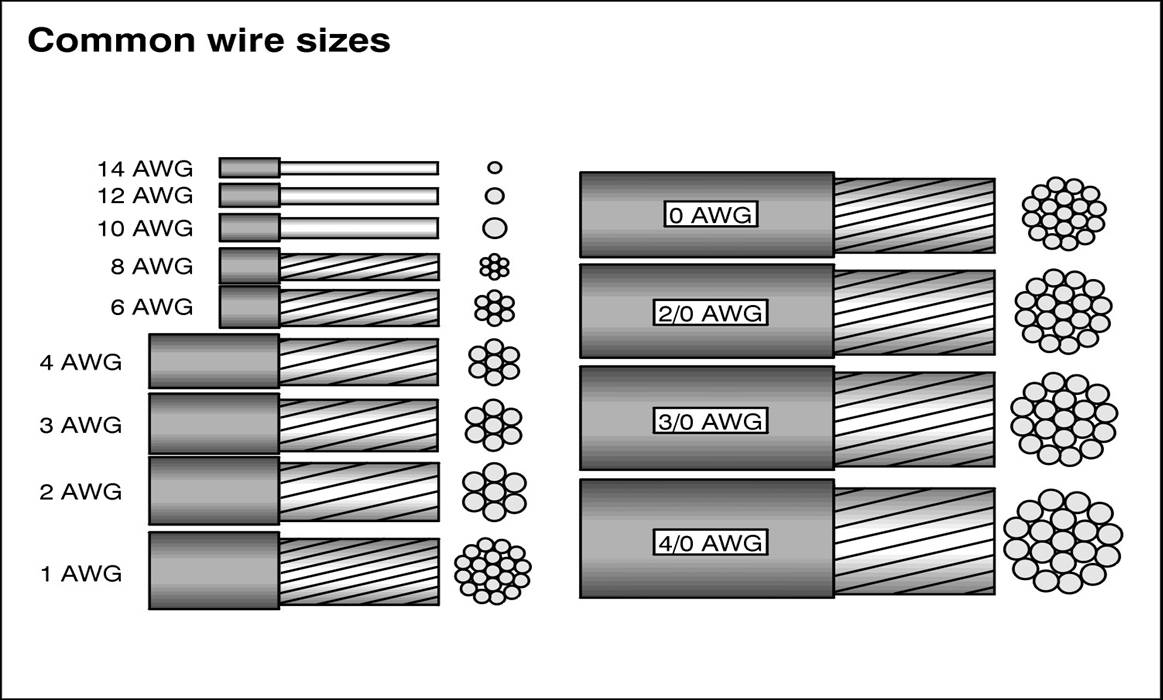
Common Wire Sizes
Twisting The Wire (Optional)
Because the wire I was using was so thin it wasn’t usable in such a thin form. To make it easier to feed more during the melting process, it was twisted together. This was done by putting one end into a vice (you could clamp it to a table if you don’t have a vice) and the other end went into a drill. All you have to do is drill away to twist it up.
[/fusion_builder_column][fusion_builder_column type=”1_1″ background_position=”left top” background_color=”” border_size=”” border_color=”” border_style=”solid” spacing=”yes” background_image=”” background_repeat=”no-repeat” padding=”” margin_top=”0px” margin_bottom=”0px” class=”” id=”” animation_type=”” animation_speed=”0.3″ animation_direction=”left” hide_on_mobile=”no” center_content=”no” min_height=”none”]

Putting Copper Wire In The Vice To Twist It
[/fusion_builder_column][fusion_builder_column type=”1_1″ background_position=”left top” background_color=”” border_size=”” border_color=”” border_style=”solid” spacing=”yes” background_image=”” background_repeat=”no-repeat” padding=”” margin_top=”0px” margin_bottom=”0px” class=”” id=”” animation_type=”” animation_speed=”0.3″ animation_direction=”left” hide_on_mobile=”no” center_content=”no” min_height=”none”]

Twisting Wire With A Drill
Melting The Copper In The Mould
At first I thought I would make a ring of copper wire, put it in the mould and heat it up with the torch, but what happened was the pressure from the torch gases blew the thin wire apart as soon as it started to melt. This might not happen if you use a slightly thicker wire.
The technique is to use layers to build up the copper in the mould.
- Start with one point and focus the torch there
- Slowly feed the copper to create a small pool
- Move the heat a little forward and continue to slowly feed the copper
[/fusion_builder_column][fusion_builder_column type=”1_1″ background_position=”left top” background_color=”” border_size=”” border_color=”” border_style=”solid” spacing=”yes” background_image=”” background_repeat=”no-repeat” padding=”” margin_top=”0px” margin_bottom=”0px” class=”” id=”” animation_type=”” animation_speed=”0.3″ animation_direction=”left” hide_on_mobile=”no” center_content=”no” min_height=”none”]
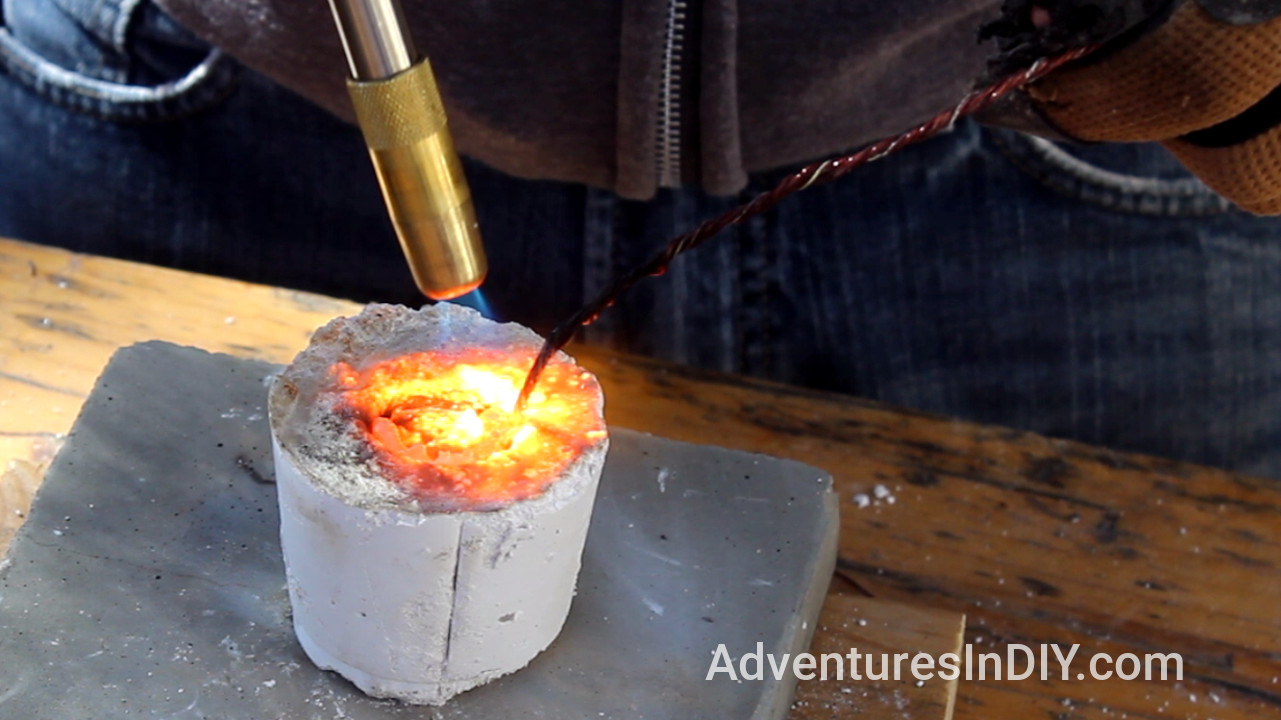
Melting Copper Wire Into Ring Mould
Tips
- I found it easier to first lay down a thin layer in the bottom of the mould and then build on that layer instead of trying to fill one section of
the mould to the top. - Make sure to angle the torch so the flame is shooting down into the mould.
Shaping The Ring
Shape The Inside
Start with the inside. The idea is that once you get the inside to fit you can shape the outside to a consistent thickness. I used a dremel that was in a vice to start shaping, but just using a round file will work just fine. Keep rotating the ring when you are removing the inside material with the dremel.
Most Important!
- Check the fit of the ring regularly so you don’t make it too big.
Shaping the inside of the copper ring video
Shape The Outside
Similar to the inside, you can flip a belt sander upside down or use files to shape the outside. When you shape the outside of the copper ring make sure you remove material in a curved motion and not flatten one area (unless you want a bolt looking ring). If you use files, put the ring in a vice to hold it in place. You can always hand sand any marks out.
Shaping the outside of the copper ring video
Make sure you round the edges of the ring so it is more comfortable.
Clean Up
For final sanding use some sandpaper up to the highest grit you have, preferably 220 grit, and buff it out using some 0000 steel wool.
Sealing The Copper Ring
Over the course of a month I tried different finishes, both lacquer and polyurethane, with all of them ending in the finish peeling off in sections.
What’s worked so far is a baked on clear engine enamel from Rustoleum. The paint can be found at most automotive parts stores, but it’s really inexpensive on Amazon.
Spray the clear engine enamel on the ring. Try to make sure you lay down thinner coats and allow an hour between each to dry. Make sure you have some coverage on the inside of the ring too.
[/fusion_builder_column][fusion_builder_column type=”1_1″ background_position=”left top” background_color=”” border_size=”” border_color=”” border_style=”solid” spacing=”yes” background_image=”” background_repeat=”no-repeat” padding=”” margin_top=”0px” margin_bottom=”0px” class=”” id=”” animation_type=”” animation_speed=”0.3″ animation_direction=”left” hide_on_mobile=”no” center_content=”no” min_height=”none”]

Rustoleum Clear Engine Enamel
When I did it, I was spraying the ring flat, and sprayed each side twice. Which means the edges got two coats and the outside and inside surfaces got 4.
Baking The Copper Ring
Let the ring dry overnight to help get rid of the off gassing before you bake the copper ring. Set the oven to 250 degrees F and put the ring in.
[/fusion_builder_column][fusion_builder_column type=”1_1″ background_position=”left top” background_color=”” border_size=”” border_color=”” border_style=”solid” spacing=”yes” background_image=”” background_repeat=”no-repeat” padding=”” margin_top=”0px” margin_bottom=”0px” class=”” id=”” animation_type=”” animation_speed=”0.3″ animation_direction=”left” hide_on_mobile=”no” center_content=”no” min_height=”none”]

Set Oven To 250 Degrees
If the ring won’t fit on the oven rack, you can put it on some parchment paper or aluminum foil.
[/fusion_builder_column][fusion_builder_column type=”1_1″ background_position=”left top” background_color=”” border_size=”” border_color=”” border_style=”solid” spacing=”yes” background_image=”” background_repeat=”no-repeat” padding=”” margin_top=”0px” margin_bottom=”0px” class=”” id=”” animation_type=”” animation_speed=”0.3″ animation_direction=”left” hide_on_mobile=”no” center_content=”no” min_height=”none”]

Curing Enamel Coating On Copper Ring
Tip
- Stay out of the dog house with your significant other by…asking if you can bake your enamel project in the oven or you can always get a cheap toaster oven.
After 30 minutes pull the ring out and let it cool off.
[/fusion_builder_column][fusion_builder_column type=”1_1″ background_position=”left top” background_color=”” border_size=”” border_color=”” border_style=”solid” spacing=”yes” background_image=”” background_repeat=”no-repeat” padding=”” margin_top=”0px” margin_bottom=”0px” class=”” id=”” animation_type=”” animation_speed=”0.3″ animation_direction=”left” hide_on_mobile=”no” center_content=”no” min_height=”none”]

Cooling Copper Ring
Let it cool down for a couple of minutes and you’re ready to wear it. If you found this article helpful, please share it and subscribe to our newsletter so you can get new articles to your email.
[/fusion_builder_column][/fusion_builder_row][/fusion_builder_container]