In this article we’ll take a look at the different steps necessary to install a outswing double door that does not have a new construction fin, some tips for painting the door and necessary finishing touches. I had a hard time finding material on how to do this install. Throughout this article you’ll see videos that helped with a certain step and links at the end to articles and PDFs.
The video below will give you an overview of the process.
Verifying and Modifying the Rough Opening
Make sure the rough opening is plumb and square. Measure out the rough opening to make sure it’s square. Measuring diagonally will tell you how close to square you are. It’s easier with a friend by the way.
You can check for plumb with a level.

Also, measure the door to make sure it is ½ -¾ inch smaller than the rough opening.


My door is 80 ½ inches tall and the rough opening was 82 inches. Manufacturer’s instructions recommends a 3/8 “ 1/2 inch gap at the top. I used layers of OSB leftover from other parts of the build to reduce the gap to right around 81 inches.


Installing the Sill Pan
There are a couple of ways you can make your own sill pan but I ended up purchasing one made from high impact ABS plastic.

Fitting the Sill Pan
Put the corners from the kit in place.


Make sure to measure twice. You only get one cut with this.

Gluing the Sill Pan Together
Do a dry fit of everything before we glue up the sill pan.

Apply PVC Cement that comes with the kit to the recessed areas of the side pieces and the underside of the center piece where it overlaps the sides.


Finally Installing the Sill Pan
Apply 3 beads of silicon caulking to adhere the sill pan to the sill.

Press the sill pan into place.

Flashing the Sides of the Door Opening
If I used a water resistive barrier house wrap, like Tyvek, instead of treating the rigid foam as a WRB, there would be house wrap wrapped around to the inside of the rough opening. To make up for this, we’re going to flash the sides. Just like when we installed windows in the previous article, cut flashing the height of the door opening.

When you apply the flashing, make sure there is at least 2 inches of the flashing on the exterior.

Installing the Door
When I was researching how to install the door, I found this article by Fine Home Building to be very helpful. What makes the door I purchased more of a pain to install is that it doesn’t have a fin on the exterior. If I were to do this again, I would make sure the door has a fin, similar to the windows, even if I had to re-frame the opening to accommodate the different door.
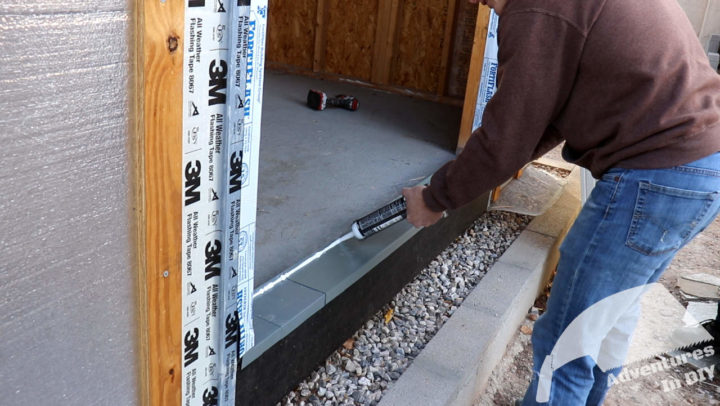
Laying a Bead of Caulk on the Sill Pan
Right before you’re ready to install the door, lay a bead of caulk along the interior edge of the sill pan. This will help with air infiltration.
We’re also going to apply a bead of caulk along the seams where the sill pan was glued for good measure.

Set the Door In-Place
Set the door in place, making sure the back of the door makes solid contact with the sealant we applied above. This is where it gets a little tricky for me because my door doesn’t have fins to keep it flush with the exterior framing. This is the time to call in your friends for help.

Shim the Door
Similar to installing the windows, it’s easier to share the videos that helped me. The first one is installing a single door but provides good fundamentals.
This next one is good for understanding the gaps around the doors.
Just like when we were shimming the windows, take your time. Double check that everything is level and plumb. If it’s not, just loosen the screws and start again.


Install the Backer Rope and Seal the Outside
We’re going to use 1/2 inch backer rope, so we don’t have to fill the void between the door and rough opening with so much sealant.

Once that’s done, use some exterior grade sealant to fill the gap.

Making the Trim
The other trim around the windows is 1 1/4 inches in depth. I want the trim around the door to mimic the windows but finding something premade that’s that depth is kind of a pain. So, I’m using going to modify some 2×3 boards. First cause their cheap and second cause their cheap.
The wood has a round over on the corners. For our shed, I want sharper corners so I’m milling the wood on a tablesaw.

Modifying Trim to Fit the Door
Using a premade sill pan has caused the door to protrude about a 1/4 of an inch from being flush with the framing. To compensate for this, I’m going to create a rabbet on the trim where it will overlap with the door frame.

I’m using a saw to do mine, but you could use a router if you had one.
The rabbet is cut so the trim will overlap the door frame about halfway making sure to keep a little space behind the hinge.

I’m pre-painting all sides of the board. Even though we’ll caulk around the edges, this will help keep water from penetrating the wood if some gets behind it.

Install Trim Around the Door
Now it’s a matter of cutting the trim to fit and install it. For the corners, I’m just mitering them. I used screws to temporarily install the pieces to make sure they fit and then switched to nails.

I was using some nails that were 2 1/2 inches long at first, then I had an internal conversation and decided I didn’t want these ever coming off. At that point, I swapped those out for some 4-inch galvanized nails. Never coming off.

Caulking Around the Trim
To help combat water getting into the door area, we’ll caulk around the exterior and where the trim meets the door frame. Remember to use an exterior rated caulk.

Painting the Doors
I did a two color paint job for the doors. White semi-gloss interior / exterior urethane alkyd enamel paint was used on the inside part of the door. For the exterior, I used Rustoleum Smoke Gray enamel paint.
To get started, we’ll need to loosen the security pin that is screwed in on the center of the hinges. Once this is done, the pins can be popped out and the doors removed.


Make it easy for yourself and remove the hinge and all the hardware from the door. Keep all the screws and hinges in a plastic bag so you don’t lose them.

I used a smooth foam roller to apply the white paint and a paint brush for the sides.

There was a series of painful events that were the reason it took me three tries to get the paint job done to my satisfaction. Well, I guess there is one silver lining is that you know if something like a fly lands on your paint and dies you just need to sand the surface till it’s smooth and paint again.

Before I get into the lessons, I used a Graco TrueCoat 360 DSP electric airless portable sprayer. I really like the sprayer for smaller jobs like this. Cleanup wasn’t that bad either.

Tips I Learned from Painting the Doors 3 Times
- If you’re using Rustoleum from a can, thin it just a little bit. I put in about a 1/3 of a cup of paint thinner in the 32oz. Graco Flexliner bag. So you don’t have to do the calculation with Google, that’s 1/3 cup of thinner to 4 cups of paint. The more viscous fluid allows you to lay down a thinner coat for faster drying and smooth finish.
- Start your paint sprayer on a lower setting and do some test runs.
- Spray the paint with the doors laying flat. I didn’t do that for the first coat and didn’t do tip #1. I immediately saw paint building up and moving.
- Protect your paint project while it dries. Make sure it has as little exposure to the elements as possible. If you can’t create a spray room like I did in the video, watch out for these things
- Sun. This accelerated the drying in one area on my door causing the paint to have a crackle affect.
- Night temperature fluctuations that cause condensation. Yes, that happened to me…..
- Wind. Try not to spray on a windy day.
Eventually I turned the inside of the shop into a spray booth with some plastic, thinned the paint and didn’t have a fly die on one of the doors.


Drilling the Secondary Door Bolts
The secondary door bolts are the sliding bolts that go into the door frame on the non primary door.

- Make the door flush with the front edge
- Mark the center of where the security pin touches the door frame
- Drill the hole for the pin with a slightly larger drill bit.


Installing the Lockset
If you’ve been following this series, you know by this point that this project is no longer just a shed to throw a lawnmower in. This will eventually be a focal point in the backyard and a selling feature for our house eventually. Because of this, we chose a more modern and not so cheap lockset.

What I liked about this lockset is the plate backing on the front and large square surround on the inside pieces. These features would allow me a little fudge factor.
Depending on your lockset, you’ll need to drill some holes. The kit will come with a template for this. The most time consuming piece for me was aligning the template with the predrilled holes on the doors.

It was really nerve wracking drilling the holes for the deadbolt area. What made it easier was the Ryobi lockset drill guide. All I can say is measure a whole bunch of times and take your time.

My door didn’t have a traditional striker plate area. The secondary door has an aluminum piece that is the length of the door. This is where the latch snaps into. I had to modify this area to get the latch to close effortlessly.

I had to do the same thing for the deadbolt area along with drilling the side of the door with a forsner bit. It’s not necessary to drill any deeper than needed for the deadbolt to catch.


Installing the Drip Edge Above the Door
The last thing to do is install a drip edge over the trim. This will help with water getting behind the trim and into the door frame.

The drip edge is a 1 1/2 inch x 1 1/2 inch piece of drip edge flashing. Use roofing nails to install it. When you nail it in place, nail in the top third of the flashing.

Costs

This part of the project cost $1,063.85 bringing the project total to $4,925.74. There are a couple of small items that need to be done before the siding can be put on. If you want content like this sent to your inbox when it’s available, please subscribe using the subscribe now area at the top right.
Hey man,
Are you still working on this project?
Looks pretty good 🙂
Hey just wanted to say keep up the good work. I am clueless in building but thanks to these videos, I have the framing almost done. My shed will be a bit different but am very closely following your steps. I’ll send pics soon.